Sunday, September 26, 2010
Fonts and Colors
In the Layout | Fonts and Colors tab, you can easily edit and customize the fonts and colors of your blog without any knowledge of HTML or CSS. (Note: Certain templates allow you to edit more elements of your blog than others.)
 Then choose the color you would like that element to be. You can either click on the color you want or enter the color hex code:

 When you change your blog colors, you can view your changes in the blog preview beneath the color panel. Make sure you save your changes after you have finished selecting the colors for your blog. If you're feeling adventurous you can click "Shuffle blog colors" to randomly shuffle all of the colors already in your blog. If you don't like your changes, you can revert back to your default colors by clicking "Revert to template default."
Tuesday, September 14, 2010
Peek-a-boo comments
Note: This article assumes you are using a classic template (without the Layouts features).
By default, a post's comments are only displayed on the post page for that post. You can show them on your main or archive pages as well, of course, but that could get crowded. A better option might be to have a link to click on your main or archive page that will make the comments appear on that page, without having to go to the post page. Something like this:
Similar to a previous hack, there are three parts to this feature: CSS, Javascript, and of course, Blogger template tags. So let's go through it step by step.
Your style sheet is usually near the top of your template, between the
By default, a post's comments are only displayed on the post page for that post. You can show them on your main or archive pages as well, of course, but that could get crowded. A better option might be to have a link to click on your main or archive page that will make the comments appear on that page, without having to go to the post page. Something like this:
Example Post
I'm not going to actually type a whole lot here. You can pretend it's long and interesting, though, if that would make you feel better. Just click the comment link here.
# posted by Graham @ 5:15 pm | 2 comments
Comments:
- Dude, you write the best posts. I always love reading your blog.
by Graham's Friend @ 6:16 pm
- I don't know. I think they're pretty bad, really.
by Graham's Enemy @ 7:17 pm
Similar to a previous hack, there are three parts to this feature: CSS, Javascript, and of course, Blogger template tags. So let's go through it step by step.
CSS
This is the simplest part. We need a couple classes that either hide comments or show comments, so you can just paste these two lines into your style sheet:.commenthidden {display:none}
.commentshown {display:inline}Your style sheet is usually near the top of your template, between the
Javascript
Add the following code to your template, between theRecent comments in the sidebar
Note: Save your template and do this at your own risk. Also, this article assumes you are using a classic template (without the Layouts features).
Providing a handy list of recent comments is a good way to let visitors see who else is reading and commenting on your blog. Also, if they are following any of the comment threads, it will be easier for them to see at a glance if other people have joined in the discussions. This feature might sit in your sidebar and look something like this:
 The date on each line will link to the page holding that particular comment so it can be read in full. Note that you can change the format of the date (and/or include the time as well) by changing the comment timestamp setting on the Settings | Comments tab in Blogger.
Comments left by Blogger members will have their names linked to their profiles. Anonymous comments, or comments left as "Other" but without a URL specified, will be unlinked. If someone comments as "Other" and specifies a URL, that will be the destination of the link.
Providing a handy list of recent comments is a good way to let visitors see who else is reading and commenting on your blog. Also, if they are following any of the comment threads, it will be easier for them to see at a glance if other people have joined in the discussions. This feature might sit in your sidebar and look something like this:
Comments left by Blogger members will have their names linked to their profiles. Anonymous comments, or comments left as "Other" but without a URL specified, will be unlinked. If someone comments as "Other" and specifies a URL, that will be the destination of the link.
Adding the Code to Your Blog
Here's the code you need to get this in your blog:How do I control who can view my blog?
By default, your blog is completely public, and can be read by anyone on the internet. However, if you want to keep it private, you can do that, too. The setting for this is on the Settings | Permissions tab.
 Under the Blog Readers heading, you'll probably see "Anybody" selected as the default. When you change this to "Only readers I choose," you'll get an Add Readers button.
 Click the Add Readers button and then enter the email address of a person to whom you want to grant access to your blog. To add multiple people, separate their addresses with commas.
 For each address entered, the Google Account associated with that address will be given access to view your blog. If an address is not associated with an account, that person will be sent an invitation email with a link allowing them do one of three things:
- Sign in to an existing account.
- Create a new account.
- View your blog as a guest (no account required).
Where does my blog's Title appear?
Your blog's title, as set in the Settings | Basic tab in Blogger, can appear in multiple places...
http://www.google.com/support/blogger
- On your published blog:
- On your Dashboard:
- In your Profile:
- On the Fresh Blogs list on the Dashboard (if your blog is listed):
http://www.google.com/support/blogger
Sunday, September 12, 2010
How do I leave comments on a blog?
If someone has comments enabled on his or her blog, then you can usually find a "comments" link at the end of each post, like this:
 In the upper left corner, there is an option to show or hide the original blog post that the comments relate to. The rest of the left-hand column contains any comments that have already been made. The profile photos of the comment authors may also display, depending on the blog's settings.
On the right hand side of the page is the space for you to enter your comment. Beneath that are the identity options. (Some of these may not be available, depending on the blog's settings.)
If you click this link, you will go to the comment posting page. (Note: in some templates, this link may take you to the post page first. From there you should be able to find the "Post a Comment" link which will take you here.) The comment posting page looks like this:
On the right hand side of the page is the space for you to enter your comment. Beneath that are the identity options. (Some of these may not be available, depending on the blog's settings.)
The options are these:
Blogger username: Your display name will appear, along with a link to your profile and your photo (if you have one).Other: You can enter your name and a link to your website, without having to have a Blogger account.Anonymous: No identifying information is displayed. The comment is credited to "Anonymous" without a link.
How do I enable comments on my blog?
To enable Comments, go to the Settings | Comments tab:
 Then select the Show radio button and click Save Settings:
 Once Comments are enabled, several more settings appear:
Who Can Comment?
Default for Posts
Only Registered Users: if not logged in already, visitors will be prompted to log into Blogger before leaving a comment. If they don't have an account, they can create one.Anyone: anybody in the whole wide world can leave commentsOnly Members of this Blog: only members of the blog (if it's a Team Blog) can leave comments
Comments Timestamp Format
New Posts Have Comments: by default, all new posts have Comments enabledNew Posts Do Not Have Comments: by default, Comments are disabled on new posts, but can be enabled on a by-post basis:

- The date and time that comments are left will be displayed in the format you choose here.
How do I delete comments?
You can delete any comment that you create on anyone else's blog, as long as you signed in to your Google Account when you left the comment. You can also delete any comments (registered or anonymous) that are left on your own blog, or on another blog for which you have admin privileges.
To delete a comment, first make sure that you are logged in to the correct Blogger account (administrator of the blog or author of the comment). Then go to the blog and find the page where the comment is listed. Next to the comment, you should see a trash can icon, like this:

Click the trash can and you will see this confirmation page, which also lists the comment for review:

To delete a comment, first make sure that you are logged in to the correct Blogger account (administrator of the blog or author of the comment). Then go to the blog and find the page where the comment is listed. Next to the comment, you should see a trash can icon, like this:
Click the trash can and you will see this confirmation page, which also lists the comment for review:
Wednesday, September 8, 2010
What is the word verification option?
The "word verification" option can be found on the Settings | Comments tab for your blog, and it looks like this:
 If you choose "yes" for this setting, then people leaving comments on your blog will be required to complete a word verification step, similar to the one presented when you create a blog:
 What this does is to prevent automated systems from adding comments to your blog, since it takes a human being to read the word and pass this step. If you've ever received a comment that looked like an advertisement or a random link to an unrelated site, then you've encountered comment spam. A lot of this is done automatically by software which can't pass the word verification, so enabling this option is a good way to prevent many such unwanted comments.
http://www.google.com/support/blogger
http://www.google.com/support/blogger
What are backlinks and how do I use them?
The Quick Answer
- Backlinks display other webpages that link to your posts.
- To enable backlinks on your blog go to your Settings|Comments tab and select Show
The backlinks setting can be found under the Settings | Comments tab, and consists of a single, simple option to turn it on or off:
Our default templates are already set up with the necessary code for backlinks. However, if you have a custom template, or one of our templates from before this feature was launched, you will need to add the code yourself. Instructions for that are here.
Once everything is set up, you'll see a new link marked "Links to this post" next to the comment link for each post:
How do I moderate comments on my blog?
The ability to moderate comments as they are added to your blog can be very handy if you want to catch any comment spam before it reaches your page or if you'd like control over the kind of messages people can leave on your blog. You can find the comment moderation setting on the Settings | Comments tab, along with all of the other comment settings:
 Selecting "Always" will automatically enable comment moderation for all incoming comments on your blog. You may also choose to moderate only older comments by specifying a number of days in the "Only on posts older than" setting. Selecting "Never" will disable comment moderation for this blog.
Enabling comment moderation then drops down an email form. This lets you moderate comments via email without affecting your regular comment notification setting. It is optional, since you can always moderate comments through the Blogger interface.
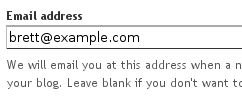 So enable comment moderation from one of the first two options, enter a notification address if desired, save the settings, and wait for your next comment. All incoming comments will now go to a special "Moderate Comments" page, which you can find under the Posting | Moderate comments tab:
 On this page, you will see a list of all the comments that have been created but have not yet been approved or rejected. (This list excludes any comments made by admin members of the blog.) By default, they will be
 Selecting "Always" will automatically enable comment moderation for all incoming comments on your blog. You may also choose to moderate only older comments by specifying a number of days in the "Only on posts older than" setting. Selecting "Never" will disable comment moderation for this blog.
Enabling comment moderation then drops down an email form. This lets you moderate comments via email without affecting your regular comment notification setting. It is optional, since you can always moderate comments through the Blogger interface.
 So enable comment moderation from one of the first two options, enter a notification address if desired, save the settings, and wait for your next comment. All incoming comments will now go to a special "Moderate Comments" page, which you can find under the Posting | Moderate comments tab:
Monday, September 6, 2010
How do I setup an FTP (or sFTP) connection to my external web host?
Go to Settings | Publishing:
 and select a connection method:
 Then, enter your settings:


When you're done, save your server details via the Save Settings button at the bottom, and republish your blog.
Notes :
When you're done, save your server details via the Save Settings button at the bottom, and republish your blog.
Notes :
How do I republish my blog?
If you have an FTP blog, you will still need to republish your blog in order to reflect updates. To republish your blog, go to Posting | Status:
 Republish Index will only republish your blog's index (home) page, and your Atom feed, if you have one:
 Republish Entire Site will do exactly that- republish all your blog's pages, including the index page, archive pages and post pages:
 A status indicator will show how much of your blog has been published :
What is the FTP path ?
FTP path tells Blogger where to place your blog files on your server. It should be of this format:
If all this sounds a bit complicated, try contacting your hosting provider for help. They can tell you how things should be set up for your specific server.
Notes:
Detailed Example (optional)
directory/directory/ (be sure to include the trailing slash)If all this sounds a bit complicated, try contacting your hosting provider for help. They can tell you how things should be set up for your specific server.
Notes:
- Do NOT use http://, ftp:// or ftp.example.com (your server's address)
- The directory you specify must already exist on your FTP Server
- This must not be an absolute path - it should be relative to your ftp root location on the server.
Detailed Example (optional)
Saturday, September 4, 2010
How do I create a team blog?
Team blogs are quite useful when small groups of people wish to contribute to a single blog. Basically, one person initially creates the blog, then adds other people to it as members.
Team members can either be administrators or not. Administrators can edit all posts (not just their own), add and remove team members (and grant admin access), and modify the blog's settings and template. Non-admins can only create and edit their own posts.
Here's how to add members to your blog:
First, go to Settings | Permissions:
 Then click Add Authors:
 Next, type the email addresses of the people you're inviting to the blog, separating each address with a comma. They'll receive an email with a confirmation link soon. Note that they must have Google Accounts, and if they don't already, they'll be prompted to create one.
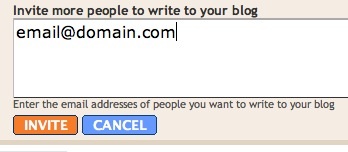 When you're ready to send the invitations, click Invite.
http://www.google.com/support/blogger
Team members can either be administrators or not. Administrators can edit all posts (not just their own), add and remove team members (and grant admin access), and modify the blog's settings and template. Non-admins can only create and edit their own posts.
Here's how to add members to your blog:
First, go to Settings | Permissions:
 Then click Add Authors:
 Next, type the email addresses of the people you're inviting to the blog, separating each address with a comma. They'll receive an email with a confirmation link soon. Note that they must have Google Accounts, and if they don't already, they'll be prompted to create one.
 When you're ready to send the invitations, click Invite.
http://www.google.com/support/blogger
Promoting Your Blog
This is in no way a science or guarantee; it's simply a few suggestions with which many bloggers have found success.
Set your blog to Send Pings. When this setting is activated, your blog will be included in various "recently updated" lists on the web as well as other blog-related services.
Activate Your Navbar. Do this and you might start to see the effects right away! One of the features on the Blogger Navbar is a button called NextBlog - click it to visit the next Navbar-enabled blog.
Install Email This Post. If you use Email This Post on your blog, people will be able to forward your posts to friends. This may not have an immediate impact on your site stats but it enables others to publicize your blog for you.
Turn on Post Pages. By publishing every post as its very own web page with Post Pages, you ensure that your entries are way more link-able and more attractive to search engines.
Turn on your site feed. When people subscribe to your site feed in their newsreaders, they're very likely going to read your post.
Add your blog to Blogger's listings. When you add your blog to our listings it shows up in Nextblog, Recently Updated, and other places. It's like opting-in to traffic.
Write quality content and do it well. If your "style" is bad writing, worse grammar, no punctuation, and an ugly design, that might be okay for a niche crowd. But the idea here is to achieve mass appeal, so fix yourself up a bit.
Publish regular updates. Simple: the more you blog, the more traffic you'll get.
Monday, August 30, 2010
How do I use the transliteration feature?
What is transliteration?
Blogger offers an automatic transliteration option for converting Roman characters to the Indic characters used in Hindi, Kannada, Malayalam, Tamil, and Telugu. This lets you type these languages phonetically in English script and still have them appear in their correct alphabet. Note that this is not the same as translation -- the sound of the words is converted from one alphabet to the other, not the meaning. For example, typing 'hamesha' transliterates into Hindi as:
Enabling the Transliteration Feature
To enable this feature, go to the Settings | Basics page, select Enable for the transliteration option, and select your preferred language. This setting will affect all blogs on your account, similar to the Compose Mode setting. Next, go to your post editor and you'll see a new button.
Typing with Transliteration
This button toggles the transliteration feature on and off. (You can also use Ctrl+G as a shortcut.) When it's on, it affects the title, labels, and body of your post. The letters of a word will appear as you type them until you reach the end of the word. As soon as you type a space or a punctuation mark, the letters will be converted to Indic characters, like this: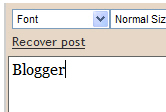
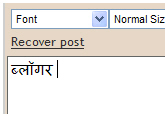 If you prefer to do the transliteration all at once, rather than as you go, you can type your text with the transliteration button turned off. Then select all your text and click the button. Everything selected will be transliterated at once, and you can go back and edit it as desired. (Note: This only works in the body of the post, not in the title or labels.)
 The transliteration will attempt to match the sounds of the letters as accurately as possible between the two alphabets. If you find that it's incorrect, however, you can fix it.
Correcting and Editing Words
Blogger Browser Matrix
Blogger's awesome wysiwyg editing features are fully supported in the latest versions of the most popular web browsers: Internet Explorer 6 and 7 on Windows, and Mozilla Firefox. Safari support is coming, eventually.
Blogger's Preview mode and HTML formatting buttons work in some older browsers, but not in others. This table shows what works where. Please upgrade your browser if you want to use Blogger's latest and greatest features!
Key:
Blogger's Preview mode and HTML formatting buttons work in some older browsers, but not in others. This table shows what works where. Please upgrade your browser if you want to use Blogger's latest and greatest features!
| Browser | Compose? | HTML buttons | Preview? | Layouts? |
|---|---|---|---|---|
| Chrome | Yes | All | Yes | Yes |
| Firefox/Win | Yes | All | Yes | Yes |
| Firefox/Mac | Yes | All | Yes | Yes |
| IE 7/Win | Yes | All | Yes | Yes |
| IE 6/Win | Yes | All | Yes | Yes |
| IE 5.5/Win | Yes | All | Yes | No |
| IE 5/Win | No | None | No | No |
| IE 5/Mac | No | None | No | No |
| Opera 9/Win | Yes**** | All | Yes | Yes |
| Opera 9/Mac | Yes**** | All | Yes | Yes |
| Safari 2.0.4/Mac | No | Some*** | Yes | No |
| Safari 2.0.4/Mac | No | Some*** | Yes | No |
| Safari 1.2.1/Mac | No | Some*** | Yes | No |
Thursday, August 26, 2010
Third-party Apps
The following is a list of cool third-party apps that integrate with Blogger in some way. Since these are third-party applications, standard disclaimers apply: your mileage may vary, you could experience data loss, we're not responsible if things go haywire, etc. If you come across any not on the list, please let us know.
If you are a developer:
To use the Blogger API, third-party clients should point to the following location:
Windows
- BlogJet
- BlogWizard
- Chrysanth WebStory
- Ecto
- NBlog
- PerfectJournal
- Photolightning
- PowerBlog
- RocketPost
- Semagic
- w.bloggar
- Zoundry
Mac OS X
Web Apps
- Audioblog
- batBack
- BlogAmp
- BloggerBox and WikyBloggerBox
- Blogger to FOAF
- Buzznet
- FeedBlitz
- FeedBurner
- Flickr
- FotoFlix
- Gabcast
- Lovento
- Photobucket
- Wikispaces
Linux
Mobile/PDA
Misc
- JS-Kit
- Chronicle Lite
- MozBlog
- RadioAtomBridge, for Radio Userland (Mac/Windows)
If you are a developer:
To use the Blogger API, third-party clients should point to the following location:
http://www.blogger.com/api
http://www.google.com/support/blogger
How do I change my site feed settings?
To enable or disable the site feed(s) for your blog, first go to the Settings | Site Feed tab.

Here, you'll have one simple option, where you can select how much of your content you want to syndicate. "Full" will put the entire content of each post in your site feed, while "Short" only includes an excerpt from the beginning of each post. The "None" option turns your site feed off entirely.

That one site feed may be enough for you, but if you want some more options, click on the "Advanced Mode" link.
Here, you'll have one simple option, where you can select how much of your content you want to syndicate. "Full" will put the entire content of each post in your site feed, while "Short" only includes an excerpt from the beginning of each post. The "None" option turns your site feed off entirely.
That one site feed may be enough for you, but if you want some more options, click on the "Advanced Mode" link.
Wednesday, August 25, 2010
Layout Guide
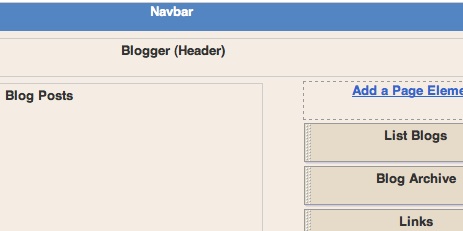
Blogger's Layout feature is an easy-to-use template editing feature that allows you to edit and customize your Blogger template without any knowledge of HTML or CSS. You can easily edit and customize the colors, fonts, header and sidebar of your blog with a few clicks of the mouse. To customize your blog's layout, go to the Layout | Page Elements tab in Blogger
.
If you're using a classic template and would like to use the Layout feature, you can read instructions on how to switch.
.

If you're using a classic template and would like to use the Layout feature, you can read instructions on how to switch.
Moving elements in your template
How to arrange elements in your template
You can arrange the elements in your template the way you want them displayed. Simply click on the element you'd like to move and drag and drop it where you want it to be. You can move your page elements to the bottom of the page, anywhere in your sidebar, or below or above your blog posts. (Note: you can move all elements except your navbar, blog posts and header in some templates.)
Page Elements Tags for Layouts
The
Each section in your template has an opening and a closing tag, looking something like this:
A
Each section in your template has an opening and a closing tag, looking something like this:
A
- id - (Required) A unique name, with letters and numbers only.
- class - (Optional) Common class names are 'navbar,' 'header,' 'main,' 'sidebar,' and 'footer.' If you switch templates later, these names help Blogger determine how best to transfer over your content. However, you can use different names, if you like.
- maxwidgets - (Optional) The maximum number of widgets to allow in this section. If you don't specify a limit, there won't be one.
- showaddelement - (Optional) Can be 'yes' or 'no,' with 'yes' as the default. This determines whether the Page Elements tab will show the 'Add a Page Element' link in this section.
- growth - (Optional) Can be 'horizontal' or 'vertical,' with 'vertical' as the default. This determines whether widgets within this section are arranged side-by-side or stacked.
Tuesday, August 24, 2010
How do I automatically email a post after I've written it?
Each of your blog posts can be automatically sent to a given email address, using our BlogSend feature. To configure this, go to Settings | Email:
 Then enter your email address:
 Notes:
http://www.google.com/support/blogger
 Then enter your email address:
- BlogSend will only send email to a single address, so multiple addresses entered here will not receive the updates. If you want to send updates to more than one address, you will need to create a mailing list. You can use a service such as Google Groups to do this. Then just enter the mailing list address in the BlogSend setting.
http://www.google.com/support/blogger
Thursday, August 19, 2010
Follow other blogs
With the Blogger Following feature you can keep track of the blogs you follow via your Reading List on the Blogger dashboard. There are several ways to become a follower of a blog. One of the easiest ways is to visit a blog that has added the 'Following' widget, ad then follow these steps:
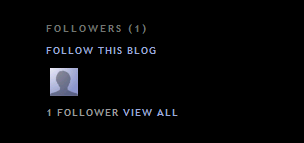
- Click the FOLLOW THIS BLOG link under the 'Followers' widget.
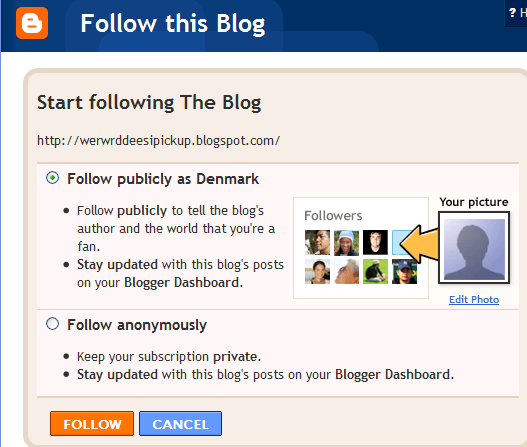
- You'll then see a pop-up window with the options to either follow publicly or anonymously.
Subscribe to:
Posts (Atom)

