Showing posts with label post. Show all posts

Tuesday, September 14, 2010

Peek-a-boo comments

Note: This article assumes you are using a classic template (without the Layouts features).
By default, a post's comments are only displayed on the post page for that post. You can show them on your main or archive pages as well, of course, but that could get crowded. A better option might be to have a link to click on your main or archive page that will make the comments appear on that page, without having to go to the post page. Something like this:

Example Post

I'm not going to actually type a whole lot here. You can pretend it's long and interesting, though, if that would make you feel better. Just click the comment link here.
# posted by Graham @ 5:15 pm | 2 comments

Comments:

  • Dude, you write the best posts. I always love reading your blog.
    by Graham's Friend @ 6:16 pm
     
  • I don't know. I think they're pretty bad, really.
    by Graham's Enemy @ 7:17 pm

Similar to a previous hack, there are three parts to this feature: CSS, Javascript, and of course, Blogger template tags. So let's go through it step by step.

CSS

This is the simplest part. We need a couple classes that either hide comments or show comments, so you can just paste these two lines into your style sheet:
.commenthidden {display:none}
.commentshown {display:inline}

Your style sheet is usually near the top of your template, between the tags. If you have your style sheet in a separate file, you'll just add these lines to that file instead of to your template.

Javascript

Add the following code to your template, between the tags:

Sunday, September 12, 2010

How do I leave comments on a blog?

If someone has comments enabled on his or her blog, then you can usually find a "comments" link at the end of each post, like this:
If you click this link, you will go to the comment posting page. (Note: in some templates, this link may take you to the post page first. From there you should be able to find the "Post a Comment" link which will take you here.) The comment posting page looks like this:
In the upper left corner, there is an option to show or hide the original blog post that the comments relate to. The rest of the left-hand column contains any comments that have already been made. The profile photos of the comment authors may also display, depending on the blog's settings.
On the right hand side of the page is the space for you to enter your comment. Beneath that are the identity options. (Some of these may not be available, depending on the blog's settings.)
The options are these:
  • Blogger username: Your display name will appear, along with a link to your profile and your photo (if you have one).
  • Other: You can enter your name and a link to your website, without having to have a Blogger account.
  • Anonymous: No identifying information is displayed. The comment is credited to "Anonymous" without a link.

How do I enable comments on my blog?

To enable Comments, go to the Settings | Comments tab:
Screenshot: Settings | Comments Then select the Show radio button and click Save Settings:
Screenshot: Show Comments Once Comments are enabled, several more settings appear:
Who Can Comment?
  • Only Registered Users: if not logged in already, visitors will be prompted to log into Blogger before leaving a comment. If they don't have an account, they can create one.
  • Anyone: anybody in the whole wide world can leave comments
  • Only Members of this Blog: only members of the blog (if it's a Team Blog) can leave comments
Default for Posts
  • New Posts Have Comments: by default, all new posts have Comments enabled
  • New Posts Do Not Have Comments: by default, Comments are disabled on new posts, but can be enabled on a by-post basis:
    Screenshot: Comment Post Options
Comments Timestamp Format
  • The date and time that comments are left will be displayed in the format you choose here.

How do I delete comments?

You can delete any comment that you create on anyone else's blog, as long as you signed in to your Google Account when you left the comment. You can also delete any comments (registered or anonymous) that are left on your own blog, or on another blog for which you have admin privileges.
To delete a comment, first make sure that you are logged in to the correct Blogger account (administrator of the blog or author of the comment). Then go to the blog and find the page where the comment is listed. Next to the comment, you should see a trash can icon, like this:


Click the trash can and you will see this confirmation page, which also lists the comment for review:


Wednesday, September 8, 2010

What are backlinks and how do I use them?

The Quick Answer

  • Backlinks display other webpages that link to your posts.
  • To enable backlinks on your blog go to your Settings|Comments tab and select Show
Backlinks enable you to keep track of other pages on the web that link to your posts. For instance, suppose Alice writes a blog entry that Bob finds interesting. Bob then goes to his own blog and writes a post of his own about it, linking back to Alice's original post. Now Alice's post will automatically show that Bob has linked to it, and it will provide a short snippet of his text and a link to his post. What it all works out to is a way of expanding the comment feature such that related discussions on other sites can be included along with the regular comments on a post.
The backlinks setting can be found under the Settings | Comments tab, and consists of a single, simple option to turn it on or off:
Our default templates are already set up with the necessary code for backlinks. However, if you have a custom template, or one of our templates from before this feature was launched, you will need to add the code yourself. Instructions for that are here.
Once everything is set up, you'll see a new link marked "Links to this post" next to the comment link for each post:
If you click that link you'll be taken to the post page, where the backlinks are all listed beneath the comments. Clicking the triangles next to each link will display a snippet of text from the page linking to you, as well as some author and date information.

How do I moderate comments on my blog?

The ability to moderate comments as they are added to your blog can be very handy if you want to catch any comment spam before it reaches your page or if you'd like control over the kind of messages people can leave on your blog. You can find the comment moderation setting on the Settings | Comments tab, along with all of the other comment settings:
Selecting "Always" will automatically enable comment moderation for all incoming comments on your blog. You may also choose to moderate only older comments by specifying a number of days in the "Only on posts older than" setting. Selecting "Never" will disable comment moderation for this blog.
Enabling comment moderation then drops down an email form. This lets you moderate comments via email without affecting your regular comment notification setting. It is optional, since you can always moderate comments through the Blogger interface.
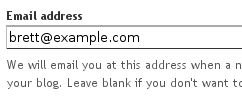
So enable comment moderation from one of the first two options, enter a notification address if desired, save the settings, and wait for your next comment. All incoming comments will now go to a special "Moderate Comments" page, which you can find under the Posting | Moderate comments tab:
On this page, you will see a list of all the comments that have been created but have not yet been approved or rejected. (This list excludes any comments made by admin members of the blog.) By default, they will be

Monday, August 30, 2010

How do I use the transliteration feature?

What is transliteration?

Blogger offers an automatic transliteration option for converting Roman characters to the Indic characters used in Hindi, Kannada, Malayalam, Tamil, and Telugu. This lets you type these languages phonetically in English script and still have them appear in their correct alphabet. Note that this is not the same as translation -- the sound of the words is converted from one alphabet to the other, not the meaning. For example, typing 'hamesha' transliterates into Hindi as:

Enabling the Transliteration Feature

To enable this feature, go to the Settings | Basics page, select Enable for the transliteration option, and select your preferred language. This setting will affect all blogs on your account, similar to the Compose Mode setting.
Next, go to your post editor and you'll see a new button.

Typing with Transliteration

This button toggles the transliteration feature on and off. (You can also use Ctrl+G as a shortcut.) When it's on, it affects the title, labels, and body of your post. The letters of a word will appear as you type them until you reach the end of the word. As soon as you type a space or a punctuation mark, the letters will be converted to Indic characters, like this:
If you prefer to do the transliteration all at once, rather than as you go, you can type your text with the transliteration button turned off. Then select all your text and click the button. Everything selected will be transliterated at once, and you can go back and edit it as desired. (Note: This only works in the body of the post, not in the title or labels.)
The transliteration will attempt to match the sounds of the letters as accurately as possible between the two alphabets. If you find that it's incorrect, however, you can fix it.

Correcting and Editing Words

Wednesday, August 25, 2010

Layout Guide

Blogger's Layout feature is an easy-to-use template editing feature that allows you to edit and customize your Blogger template without any knowledge of HTML or CSS. You can easily edit and customize the colors, fonts, header and sidebar of your blog with a few clicks of the mouse. To customize your blog's layout, go to the Layout | Page Elements tab in Blogger

.Layouts Tab
If you're using a classic template and would like to use the Layout feature, you can read instructions on how to switch.

Moving elements in your template

How to arrange elements in your template

You can arrange the elements in your template the way you want them displayed. Simply click on the element you'd like to move and drag and drop it where you want it to be. You can move your page elements to the bottom of the page, anywhere in your sidebar, or below or above your blog posts. (Note: you can move all elements except your navbar, blog posts and header in some templates.) Layouts


Tuesday, August 24, 2010

How do I automatically email a post after I've written it?

Each of your blog posts can be automatically sent to a given email address, using our BlogSend feature. To configure this, go to Settings | Email:
Settings | Email Then enter your email address:
Settings | Email Notes:

  • BlogSend will only send email to a single address, so multiple addresses entered here will not receive the updates. If you want to send updates to more than one address, you will need to create a mailing list. You can use a service such as Google Groups to do this. Then just enter the mailing list address in the BlogSend setting.


http://www.google.com/support/blogger

Monday, August 16, 2010

How can I let people email my posts to their friends?

Email This Post enables your blog readers to share your posts with others.
Let's say a visitor to your blog just loves your post about The Secret Valor of Chickens. Now that visitor can let her friends know about your discovery by emailing out a link to your post. It's a great way to let your readers share what they've seen on your blog.
To enable this feature, set Show Email Post links? to Yes in the Settings | Basic tab in Blogger:
Quick Edit 
setting Here's what they look like:
Quick Edit 
link
Notes:
  • To prevent spamming and encourage blog visits, a link is sent via email rather than the post body
  • If you have a classic template, you must have the <$BlogMetaData$> tag in your Template's section, and the <$BlogItemControl$> tag wherever you want the Mail links to appear. We suggest somewhere in your "posted by" line. (Our default templates already have all the correct code.)
  • If you're publishing via FTP, you'll need to republish your blog's index page in order for the links to appear.
  • CSS files are aggressively cached by browsers for performance reasons. This means you may have to reload or even super-reload (using the shift key) to make links appear after you first enable them.


http://www.google.com/support/blogger

What is BlogThis! ?

BlogThis!BlogThis! is an easy way to make a blog post without visiting blogger.com. Once you add the BlogThis! link to your browser's toolbar, blogging will be a snap. Or rather, a click. Clicking BlogThis! creates a mini-interface to Blogger prepopulated with a link to the web page you are visiting, as well as any text you have highlighted on that page. Add additional text if you wish and then publish or post from within BlogThis!
There are two ways to use BlogThis!: if you use Windows and Internet Explorer, you can use BlogThis! from the SendTo feature of the Google Toolbar. If you're on another browser, just drag the link below to your browser's Link bar.

Sunday, August 15, 2010

How do I import and export blogs on Blogger?

The import and export features on Blogger give your content a whole new range of portability and freedom, allowing you to create copies of your own blogs as well as import them into other existing ones. Best of all-we've made this a very simple process!

Import as a New Blog

To import content as a brand new blog, click Create a Blog from your dashboard.
Then under Advanced Options, click the Import Blog Tool
Finally, choose the Blogger export file (.xml) from your hard drive and fill out the word verification. Click the Upload arrow and your new bog will be created instantly!

Import Into an Existing Blog

To import posts and comments into an already existing blog, start by clicking Import Blog from the existing blog's Settings | Basic tab.
 
Note: Your template will not be affected by the imported content.
 
Next, choose a Blogger export file (.xml) from your hard drive and fill out the word verification beneath. By default, all of your imported posts will remain unpublished until you publish them from your dashboard later. However, if you would rather have all posts published immediately, make sure to check the box next to Automatically publish all imported posts before you click Import Blog.
If you did not choose to have your posts publish automatically, you will need to manually publish them from the Posting | Edit Posts tab before they will appear on the web. You can either publish all the posts at once by clicking Publish all imported posts, or publish individual posts by selecting them and then clicking Publish Selected.

Exporting Your blog

To export your blog, simply click Export Blog from the Settings | Basic tab.
Finally, click the Export Blog button. You blog will be stored as a Blogger export file (.xml) file which can be kept as a backup on your hard drive or imported into another blog.
Note: Exported blogs are not deleted from your dashboard or Blogger.com


http://www.google.com/support/blogger

How can I edit labels on multiple posts at once?

The Edit Posts page includes options for displaying posts by label, and for applying or removing labels on batches of posts. To get there, visit the Posting | Edit Posts tab, or just click the Manage Posts link on your dashboard.
This page has all labels in use by this blog listed on the left-hand side. Each individual post also has its particular labels marked in green next to its title. By default, posts with all labels are shown.
(Note: You'll only see the labels here if you have at least one post already labeled. You can label an individual post on the posting form.)

How do I label my posts?

The Basics

When you're writing a post, you'll have a space at the bottom of the form marked "Labels for this post." Enter whatever labels you like, separating them with commas. You can also click the "show all" link to display a list of labels you've used previously. Then just click on the labels to add them.
When you publish your post, the labels will be listed with it. Clicking any of the labels will take you to a page containing only posts with that label.

Advanced Use

You can easily change the formatting used here by editing your blog's layout.

Friday, August 13, 2010

Creating 'After the jump' summaries

After the Jump is a feature which lets you create expandable post summaries in your blog posts, so longer posts appear as an intro with a link to Read More
Creating jump breaks in your blog posts can be easily done right from the post editor, without the need for any HTML changes. First, decide where in the post you want to create the jump break, and place your cursor in that position:


Once your mouse cursor is placed at the jump point, simply click the Insert Jump Break toolbar icon:


Clicking the icon will insert a grey bar at the cursor point, illustrating where in the post your break will appear. The bar can be dragged though, so you can always re-position it after insertion.

If you don't use the new post editor, you can still insert a jump break in Edit HTML mode by adding

Wednesday, August 11, 2010

How do I post pictures?

You can now upload photos to your blog(s) using Blogger Images; just click the image icon in the post editor's toolbar.
When you click this icon, you'll get a window that allows you to select an image or multiple images from your computer. Click the Browse button to locate the ones you want. Alternatively, you can enter the URL of an image that's already online and insert it into your post.

Sunday, August 8, 2010

All about Blogger's post editor

Blogger's post editor has three modes:
  • Compose: a wysiwyg mode where you manipulate text with formatting buttons
  • Edit HTML: a raw mode where you edit the html manually
  • Preview: renders a full-body preview of the post, including its Title, links and images
To switch between these modes, simply click the appropriate link:
Blogger post editor modes If you'd rather not use the wysiwyg editor, you can disable it in the Settings | Basic tab in Blogger. The formatting buttons are only available in certain browsers, as explained in this Help article. Keyboard shortcuts are also available; they can greatly speed up the posting process and we encourage you to use them.
Post Editor Features, from left-to-right:
  • Font
  • Font size
  • Bold
  • Italic
  • Font color
  • Link
  • Left-justify
  • Center
  • Right-justify
  • Full-justify
  • Ordered (numbered) list
  • Unordered (bullet) list
  • Blockquote
  • Spell check
  • Upload image
  • Remove formatting from selection
Developing an advanced, standards-compliant web-based rich text editor presented a significant engineering challenge. If you'd like to know more about its development, one of our engineers posted a nice writeup about it on his blog.


http://www.google.com/support/blogger

Saturday, August 7, 2010

FIRST POSTING


  • Click the Posting tab
  • Click New Post
  • Fill your post title in the Title
  • Load the contents of a post on the post
  • Click Publish Post
  • The results will appear on your blog page.


MAKE NEW BLOG

Make new blog is easy, you can make free blog in many free blog site, for Example Blogspot. The step is :
1. Go to Blogspot, http://www.blogspot.com . You must have Blogspot or Google account.


2. Sign in with your account.
3. Click on “Create a blog
4. Write your blog name, ex. Blog Tips


5. Write your URL name, ex. goblogtips.blogspot.com
6. Write the displayed word