Monday, August 30, 2010

How do I use the transliteration feature?

What is transliteration?

Blogger offers an automatic transliteration option for converting Roman characters to the Indic characters used in Hindi, Kannada, Malayalam, Tamil, and Telugu. This lets you type these languages phonetically in English script and still have them appear in their correct alphabet. Note that this is not the same as translation -- the sound of the words is converted from one alphabet to the other, not the meaning. For example, typing 'hamesha' transliterates into Hindi as:

Enabling the Transliteration Feature

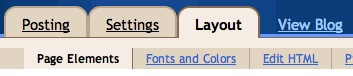
To enable this feature, go to the Settings | Basics page, select Enable for the transliteration option, and select your preferred language. This setting will affect all blogs on your account, similar to the Compose Mode setting.
Next, go to your post editor and you'll see a new button.

Typing with Transliteration

This button toggles the transliteration feature on and off. (You can also use Ctrl+G as a shortcut.) When it's on, it affects the title, labels, and body of your post. The letters of a word will appear as you type them until you reach the end of the word. As soon as you type a space or a punctuation mark, the letters will be converted to Indic characters, like this:
If you prefer to do the transliteration all at once, rather than as you go, you can type your text with the transliteration button turned off. Then select all your text and click the button. Everything selected will be transliterated at once, and you can go back and edit it as desired. (Note: This only works in the body of the post, not in the title or labels.)
The transliteration will attempt to match the sounds of the letters as accurately as possible between the two alphabets. If you find that it's incorrect, however, you can fix it.

Correcting and Editing Words

Blogger Browser Matrix

Blogger's awesome wysiwyg editing features are fully supported in the latest versions of the most popular web browsers: Internet Explorer 6 and 7 on Windows, and Mozilla Firefox. Safari support is coming, eventually.
Blogger's Preview mode and HTML formatting buttons work in some older browsers, but not in others. This table shows what works where. Please upgrade your browser if you want to use Blogger's latest and greatest features!
Browser Compose? HTML buttons Preview? Layouts?
Chrome Yes All Yes Yes
Firefox/Win Yes All Yes Yes
Firefox/Mac Yes All Yes Yes
IE 7/Win Yes All Yes Yes
IE 6/Win Yes All Yes Yes
IE 5.5/Win Yes All Yes No
IE 5/Win No None No No
IE 5/Mac No None No No
Opera 9/Win Yes**** All Yes Yes
Opera 9/Mac Yes**** All Yes Yes
Safari 2.0.4/Mac No Some*** Yes No
Safari 1.2.1/Mac No Some*** Yes No
Key:

Thursday, August 26, 2010

Third-party Apps

The following is a list of cool third-party apps that integrate with Blogger in some way. Since these are third-party applications, standard disclaimers apply: your mileage may vary, you could experience data loss, we're not responsible if things go haywire, etc. If you come across any not on the list, please let us know.

Windows

Mac OS X

Web Apps

Linux

Mobile/PDA

Misc

Related Links:
If you are a developer:

To use the Blogger API, third-party clients should point to the following location:
http://www.blogger.com/api
 
 
http://www.google.com/support/blogger 

How do I change my site feed settings?

To enable or disable the site feed(s) for your blog, first go to the Settings | Site Feed tab.

Here, you'll have one simple option, where you can select how much of your content you want to syndicate. "Full" will put the entire content of each post in your site feed, while "Short" only includes an excerpt from the beginning of each post. The "None" option turns your site feed off entirely.
Basic site feed settings
That one site feed may be enough for you, but if you want some more options, click on the "Advanced Mode" link.

Wednesday, August 25, 2010

Layout Guide

Blogger's Layout feature is an easy-to-use template editing feature that allows you to edit and customize your Blogger template without any knowledge of HTML or CSS. You can easily edit and customize the colors, fonts, header and sidebar of your blog with a few clicks of the mouse. To customize your blog's layout, go to the Layout | Page Elements tab in Blogger

.Layouts Tab
If you're using a classic template and would like to use the Layout feature, you can read instructions on how to switch.

Moving elements in your template

How to arrange elements in your template

You can arrange the elements in your template the way you want them displayed. Simply click on the element you'd like to move and drag and drop it where you want it to be. You can move your page elements to the bottom of the page, anywhere in your sidebar, or below or above your blog posts. (Note: you can move all elements except your navbar, blog posts and header in some templates.) Layouts


Page Elements Tags for Layouts

The section of a Layouts template is made up primarily of sections and widgets. Sections mark out areas of your page, such as the sidebar, footer, etc. A widget is an individual page element such as a picture, a blogroll, or anything else you can add from the Page Elements tab. You can include any HTML you like around the sections in your template.
Each section in your template has an opening and a closing tag, looking something like this:


A tag can have the following attributes:
  • id - (Required) A unique name, with letters and numbers only.
  • class - (Optional) Common class names are 'navbar,' 'header,' 'main,' 'sidebar,' and 'footer.' If you switch templates later, these names help Blogger determine how best to transfer over your content. However, you can use different names, if you like.
  • maxwidgets - (Optional) The maximum number of widgets to allow in this section. If you don't specify a limit, there won't be one.
  • showaddelement - (Optional) Can be 'yes' or 'no,' with 'yes' as the default. This determines whether the Page Elements tab will show the 'Add a Page Element' link in this section.
  • growth - (Optional) Can be 'horizontal' or 'vertical,' with 'vertical' as the default. This determines whether widgets within this section are arranged side-by-side or stacked.
A section can contain widgets; it can't contain other sections or other code. If you need to insert extra code between or around certain widgets within a section, you'll need to split the section into two or more new sections.

Tuesday, August 24, 2010

How do I automatically email a post after I've written it?

Each of your blog posts can be automatically sent to a given email address, using our BlogSend feature. To configure this, go to Settings | Email:
Settings | Email Then enter your email address:
Settings | Email Notes:

  • BlogSend will only send email to a single address, so multiple addresses entered here will not receive the updates. If you want to send updates to more than one address, you will need to create a mailing list. You can use a service such as Google Groups to do this. Then just enter the mailing list address in the BlogSend setting.


http://www.google.com/support/blogger

Thursday, August 19, 2010

Follow other blogs

With the Blogger Following feature you can keep track of the blogs you follow via your Reading List on the Blogger dashboard. There are several ways to become a follower of a blog. One of the easiest ways is to visit a blog that has added the 'Following' widget, ad then follow these steps:
  1. Click the FOLLOW THIS BLOG link under the 'Followers' widget. following blogs
  2. You'll then see a pop-up window with the options to either follow publicly or anonymously. settings for following blogs

Privacy and permissions

By default, your blog is completely public, and can be read by anyone on the internet. However, if you want to keep it private, you can do that, too. You cna change these settings on the Settings | Permissions tab.
  1. Under the 'Blog Readers' heading, you'll probably see 'Anybody' selected as the default. When you change this to 'Only readers I choose,' you'll get an Add Readers button.
  2. Click the Add Readers button and then enter the email address of a person to whom you'd like to grant access to your blog. To add multiple people, separate their addresses with commas.
  3. For each address entered, the Google Account associated with that address will be given access to view your blog. If an address is not associated with an account, that person will receive an invitation email with a link allowing them do one of three things:

How do I move a blog between accounts?

The short answer is that you can do this by making the blog in question a team blog, with two members, then removing the original team member.
In detail, the process goes like this:
  1. Sign in to Blogger with Account 1, which we'll assume is the account containing the blog.
  2. Go to the Settings | Permissions tab.
  3. Click the Add Authors button and send an invitation to the owner of Account 2, the account to which you'd like to move the blog.
  4. Wait for the owner of Account 2 to accept the invitation. If you're sharing a computer, you'll need to sign out of Account 1 first, or each use a different browser.
  5. Once Account 2 has joined the blog, Account 1 can log in again and go back to the Settings | Permissions tab.

How can I recover my username and password in Blogger?

If you ever forget any of your login information, just click the "forgot?" link in the upper-right corner of the Blogger home page. (Or you can go directly to the form here.)
Forgot your password Here you can request your password to be sent to you in email by entering your Google Account email address.
Forgotten Password If you've forgotten your Google Account username and you've set up a Google Account for a non-Gmail address,

Wednesday, August 18, 2010

Can I edit the HTML of my blog's layout?

Yes, just go to the >Layout tab and click the Edit HTML sub-tab. Keep in mind that Blogger's Layouts feature makes it easy for anyone to customize the look of their blog with little or no technical knowledge.
The first thing on the Edit HTML page is an option to download a copy of your template to a text file on your hard drive. We highly recommend doing this if you've made any interesting customizations to your design at all. Then, if you make a mistake editing your template, or if you just don't like the way it comes out, you can revert easily by uploading the same file again.
Next comes the actual code for your template. You'll notice it looks somewhat like regular HTML and CSS, but also includes lots of custom tags that make it compatible with our drag-and-drop layout editor, and with the font and color picker. If you want to make extensive changes to your code, you'll want to read up on these tags first:
  • Page Element Tags
  • Fonts and Colors Tags
You'll also see an option to 'Expand Widget Templates.' By default, each page element is shown in the code as a one-line placeholder, whose options can be set in the graphical interface on the Page Elements tab. Turning this option on will show the complete data and template for each element. The code is simpler the first way, but you have more control the second way, so use whichever option you prefer. Learn more by reading this help article:
  • Widget Template Tags
Below the code, you'll see three buttons for Clear Edits, Preview, and Save Template, which do what you'd expect them to.
There are also two links referring to your 'classic template.' If you converted your blog from the older style of Blogger templates to the new Layouts version, then your classic template is the last template you used in the old system, with all your customizations. If your blog was created on the new system and has always used Layouts, then your classic template is a default, classic version of the original design you chose when you created the blog, without any customizations. The View link will show you the code, in case you just want to check up on something, or copy a piece of it for your new design. The Revert link will erase all the customizations you made in the Layouts feature and set your blog to use the old-style Blogger template again. Note that you won't be able to use the graphical Layouts interface in this mode (though you can convert back to Layouts again later).


http://www.google.com/support/blogger

Blogger Template Designer

Blogger Template Designer is a new way for you to easily customize the look of your blog. You can select a variety of templates, images, colors, and column layouts to make your blog an expression of you.
As you play around with the Template Designer, you’ll see a preview of how the blog will appear based on the choices you’ve made, which you can expand to by pressing the toggle to Expand Preview between the Blogger Template Designer dashboard and the preview. When you’re satisfied with the look of your blog, you can make them go live by pressing Apply to Blog in the top right hand corner of the Template Designer.
To get started with Blogger Template Designer, select a template for your blog from one of the professionally designed templates that are available. Each template appears as a large thumbnail that when clicked will show different variations on the template below that you can select by clicking on them. Note that clicking a new template will erase any customizations you’ve made on a previous template. Once you’ve chosen a template, you can continue customizing the look of your blog.


No matter what template you are previewing in Template Designer, you can always see what is currently live on your blog by looking at the Live on Blog thumbnail in the Template Designer control panel. You can also click on it to reset the template in the Template Designer to the live version of your blog.

Background

Even though you’ve chosen a template, you can still change the way that it looks. Using Blogger Template Designer, you can choose the background color or image for your blog and then play with the color scheme. To start customizing your background, click on the thumbnail under Background Image.

Monday, August 16, 2010

How can I let people email my posts to their friends?

Email This Post enables your blog readers to share your posts with others.
Let's say a visitor to your blog just loves your post about The Secret Valor of Chickens. Now that visitor can let her friends know about your discovery by emailing out a link to your post. It's a great way to let your readers share what they've seen on your blog.
To enable this feature, set Show Email Post links? to Yes in the Settings | Basic tab in Blogger:
Quick Edit 
setting Here's what they look like:
Quick Edit 
link
Notes:
  • To prevent spamming and encourage blog visits, a link is sent via email rather than the post body
  • If you have a classic template, you must have the <$BlogMetaData$> tag in your Template's section, and the <$BlogItemControl$> tag wherever you want the Mail links to appear. We suggest somewhere in your "posted by" line. (Our default templates already have all the correct code.)
  • If you're publishing via FTP, you'll need to republish your blog's index page in order for the links to appear.
  • CSS files are aggressively cached by browsers for performance reasons. This means you may have to reload or even super-reload (using the shift key) to make links appear after you first enable them.


http://www.google.com/support/blogger

How do I change the format of the dates displayed in my blog?

You can change the date format for both posts and archive links by editing your blog settings. On the Settings | Formatting page, there are fields for Date Header Format and Archive Index Date Format. Both fields include drop-down menus that list the format options for displaying dates.

 Date Header Format:

Date
 Header Format (Date Headers usually go above your posts.)

Archive Index Date Format:

Archive Date Format (The Archive Index is usually the list of archive links in your sidebar.)
Click Save Settings at the bottom of the page when you're done.

http://www.google.com/support/blogger

How does Blogger Mobile work?

You send a message - which can be a photo, some text, or both - to go@blogger.com. We take care of the rest. In other words, we auto-provision a new blog and publish the post. It's that simple.
Here's how to start a mobile blog:
  1. Text REGISTER to BLOGGR to create your mobile blog. The text and/or photo in your message will be uploaded to that blog right away. We'll message you back with the address, (so you can visit your new blog on the web) and a token (so you can claim your blog and access it from your account).
  2. OPTIONAL - If you feel like changing anything on your new mobile blog or if you already have a Blogger account and want the posts to go to your existing blog, you can log in to go.blogger.com and enter the token we sent to your phone. You'll then have the option to claim your new mobile blog and merge it with your existing blog. Note to users whose blog address does not contain blogspot.com: Once you make the aforementioned switch, new mobile posts will be published to your chosen blog but mobile posts published prior to the switch will not be moved over automatically.
What types of messages can I send to Blogger Mobile from my phone?
MMS, SMS, or Email - note this doesn't include email sent from a mobile device that actually passes through a webmail gateway (such as mail sent from your stanford.edu account from your phone).

What size photos can I send?

What is BlogThis! ?

BlogThis!BlogThis! is an easy way to make a blog post without visiting blogger.com. Once you add the BlogThis! link to your browser's toolbar, blogging will be a snap. Or rather, a click. Clicking BlogThis! creates a mini-interface to Blogger prepopulated with a link to the web page you are visiting, as well as any text you have highlighted on that page. Add additional text if you wish and then publish or post from within BlogThis!
There are two ways to use BlogThis!: if you use Windows and Internet Explorer, you can use BlogThis! from the SendTo feature of the Google Toolbar. If you're on another browser, just drag the link below to your browser's Link bar.

How do I post audio/music to my blog?

The Quick Answer

  • Choose whether to embed audio/music from a third-party site or to host your own (podcast).
  • To podcast, choose a host to store your audio files, then enable 'Link Fields' in your Settings | Formatting tab.
  • Use the link field to enclose audio files in your posts.
If you'd like to put music or audio on your blog, there are many options available to you. First you'll have to decide whether you want to host your own audio files or merely embed them from an existing third-party site.

Embedding music/audio from third-party sites

If you'd like to embed a playlist or functionality from a third-party music service such as Last.fm or Imeem, Blogger's layouts feature makes it easy.
  1. Visit your Template | Page Elements tab.
  2. Create a new widget by clicking "Add a Page Element."
  3. Choose the "HTML/Javascript" widget.
  4. Enter the HTML code provided by your third-party music service into the content window and click "Save Changes."
If you can't find the necessary code, you may have to contact your third-party music service. Feel free to position the page element wherever you'd like.

Sunday, August 15, 2010

How do I import and export blogs on Blogger?

The import and export features on Blogger give your content a whole new range of portability and freedom, allowing you to create copies of your own blogs as well as import them into other existing ones. Best of all-we've made this a very simple process!

Import as a New Blog

To import content as a brand new blog, click Create a Blog from your dashboard.
Then under Advanced Options, click the Import Blog Tool
Finally, choose the Blogger export file (.xml) from your hard drive and fill out the word verification. Click the Upload arrow and your new bog will be created instantly!

Import Into an Existing Blog

To import posts and comments into an already existing blog, start by clicking Import Blog from the existing blog's Settings | Basic tab.
 
Note: Your template will not be affected by the imported content.
 
Next, choose a Blogger export file (.xml) from your hard drive and fill out the word verification beneath. By default, all of your imported posts will remain unpublished until you publish them from your dashboard later. However, if you would rather have all posts published immediately, make sure to check the box next to Automatically publish all imported posts before you click Import Blog.
If you did not choose to have your posts publish automatically, you will need to manually publish them from the Posting | Edit Posts tab before they will appear on the web. You can either publish all the posts at once by clicking Publish all imported posts, or publish individual posts by selecting them and then clicking Publish Selected.

Exporting Your blog

To export your blog, simply click Export Blog from the Settings | Basic tab.
Finally, click the Export Blog button. You blog will be stored as a Blogger export file (.xml) file which can be kept as a backup on your hard drive or imported into another blog.
Note: Exported blogs are not deleted from your dashboard or Blogger.com


http://www.google.com/support/blogger

How can I edit labels on multiple posts at once?

The Edit Posts page includes options for displaying posts by label, and for applying or removing labels on batches of posts. To get there, visit the Posting | Edit Posts tab, or just click the Manage Posts link on your dashboard.
This page has all labels in use by this blog listed on the left-hand side. Each individual post also has its particular labels marked in green next to its title. By default, posts with all labels are shown.
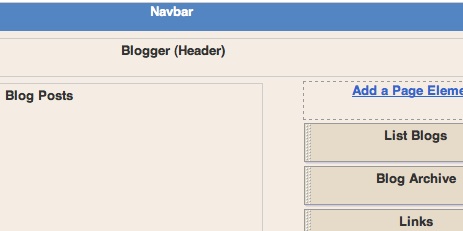
(Note: You'll only see the labels here if you have at least one post already labeled. You can label an individual post on the posting form.)

How do I label my posts?

The Basics

When you're writing a post, you'll have a space at the bottom of the form marked "Labels for this post." Enter whatever labels you like, separating them with commas. You can also click the "show all" link to display a list of labels you've used previously. Then just click on the labels to add them.
When you publish your post, the labels will be listed with it. Clicking any of the labels will take you to a page containing only posts with that label.

Advanced Use

You can easily change the formatting used here by editing your blog's layout.

Friday, August 13, 2010

Creating 'After the jump' summaries

After the Jump is a feature which lets you create expandable post summaries in your blog posts, so longer posts appear as an intro with a link to Read More
Creating jump breaks in your blog posts can be easily done right from the post editor, without the need for any HTML changes. First, decide where in the post you want to create the jump break, and place your cursor in that position:


Once your mouse cursor is placed at the jump point, simply click the Insert Jump Break toolbar icon:


Clicking the icon will insert a grey bar at the cursor point, illustrating where in the post your break will appear. The bar can be dragged though, so you can always re-position it after insertion.

If you don't use the new post editor, you can still insert a jump break in Edit HTML mode by adding

Comment Inbox

To make it easier for you to manage your comments, we’ve created a new Comments tab for you to access them. Here, you can manage published comments, comments that have been flagged as spam and comments awaiting moderation if you have turned on Comment Moderation.


Users with Comment Moderation turned on will continue to see comments that need moderation and have not been flagged as spam in Comments | Awaiting Moderation. Users without Comment Moderation will not see any comments in Comments | Awaiting Moderation.

Spam Inbox

Wednesday, August 11, 2010

Clearing Your Cache and Cookies

Most browsers hold a saved copy of visited webpages. Clearing your browser's cache and/or cookies can resolve a number of problems you may be experiencing while using Blogger or other sites on the web. Instructions for clearing your cache and cookies are different for each browser type.
To clear your cache and cookies, please follow the steps below.

For MS Internet Explorer:

  1. Click Tools at the top of your browser window.
  2. Select Internet Options from the menu.
  3. Select the General tab, if it's not already selected.
  4. Locate the Browsing history section and click Delete.
  5. In the Temporary Internet Files section, click Delete files If a pop-up window appears, click Yes.
  6. In the Cookies section, click Delete cookies If a pop-up window appears, click Yes.


For Mozilla Firefox:

  1. Click Tools at the top of your browser window.

How do I post pictures?

You can now upload photos to your blog(s) using Blogger Images; just click the image icon in the post editor's toolbar.
When you click this icon, you'll get a window that allows you to select an image or multiple images from your computer. Click the Browse button to locate the ones you want. Alternatively, you can enter the URL of an image that's already online and insert it into your post.

Sunday, August 8, 2010

Promoting Your Blog

This is in no way a science or guarantee; it's simply a few suggestions with which many bloggers have found success.

Set your blog to Send Pings. When this setting is activated, your blog will be included in various "recently updated" lists on the web as well as other blog-related services.
Activate Your Navbar. Do this and you might start to see the effects right away! One of the features on the Blogger Navbar is a button called NextBlog - click it to visit the next Navbar-enabled blog.
Install Email This Post. If you use Email This Post on your blog, people will be able to forward your posts to friends. This may not have an immediate impact on your site stats but it enables others to publicize your blog for you.
Turn on Post Pages. By publishing every post as its very own web page with Post Pages, you ensure that your entries are way more link-able and more attractive to search engines.
Turn on your site feed. When people subscribe to your site feed in their newsreaders, they're very likely going to read your post.

How do I post via email?

The Mail-to-Blogger feature turns any email account into a blog-posting application. In Settings | Email you can create a Mail-to-Blogger address which you will use to send posts via email to your blog:
Settings | Email tab To post to your blog via email, you need to configure your Mail-to-Blogger email address in Settings | Email:
The format of the email address is username.secretword@blogger.com. Note that this email address must be kept secret. Otherwise, anyone who gets it will be able to post as you.
Also be sure to specify whether or not you prefer your email posts to publish automatically. If this option is not checked, then your posts will be saved on your account but will not appear on your blog until you log in to Blogger.com and publish them yourself.
Once you have saved your Settings, you can send email to your blog. The subjects of your email letters will be the titles of your posts, and the body of the emails will be the posts themselves. To include an image in your post, you can attach an image to you your email.
Notes:
  • Sometimes email programs append text to the bottom of each sent message; to make sure this cruft doesn't get posted to your blog, put #end at the end of your post.

http://www.google.com/support/blogger

What is a URL?

A URL is the location of a file on the Web. Some examples of URLs include http://www.blogger.com/, or http://myblog.blogspot.com/


The URL you select will be used by visitors, or yourself, to access your blog.
During the blog creation process, you'll have to select a URL for your blog if you want it hosted on Blog*Spot. Since there are already a large number of Blog*Spot blogs, you'll need to get creative and possibly try a few different ones before you find one that's available.
One thing to note when selecting your blog's URL is that hyphens (also know as dashes, - ) are the only non-alphanumeric characters allowed. Spaces aren't permitted, nor are underscores (_) or any other special characters.

http://www.google.com/support/blogger

All about Blogger's post editor

Blogger's post editor has three modes:
  • Compose: a wysiwyg mode where you manipulate text with formatting buttons
  • Edit HTML: a raw mode where you edit the html manually
  • Preview: renders a full-body preview of the post, including its Title, links and images
To switch between these modes, simply click the appropriate link:
Blogger post editor modes If you'd rather not use the wysiwyg editor, you can disable it in the Settings | Basic tab in Blogger. The formatting buttons are only available in certain browsers, as explained in this Help article. Keyboard shortcuts are also available; they can greatly speed up the posting process and we encourage you to use them.
Post Editor Features, from left-to-right:
  • Font
  • Font size
  • Bold
  • Italic
  • Font color
  • Link
  • Left-justify
  • Center
  • Right-justify
  • Full-justify
  • Ordered (numbered) list
  • Unordered (bullet) list
  • Blockquote
  • Spell check
  • Upload image
  • Remove formatting from selection
Developing an advanced, standards-compliant web-based rich text editor presented a significant engineering challenge. If you'd like to know more about its development, one of our engineers posted a nice writeup about it on his blog.


http://www.google.com/support/blogger

Saturday, August 7, 2010

FIRST POSTING


  • Click the Posting tab
  • Click New Post
  • Fill your post title in the Title
  • Load the contents of a post on the post
  • Click Publish Post
  • The results will appear on your blog page.


MAKE NEW BLOG

Make new blog is easy, you can make free blog in many free blog site, for Example Blogspot. The step is :
1. Go to Blogspot, http://www.blogspot.com . You must have Blogspot or Google account.


2. Sign in with your account.
3. Click on “Create a blog
4. Write your blog name, ex. Blog Tips


5. Write your URL name, ex. goblogtips.blogspot.com
6. Write the displayed word

Post

This is the first post...